


How to Get Glowing Skin with These 10 Holistic Skin Remedies

When things go haywire—at work, in our families, relationships, or even within ourselves—it’s easy to fall into the habit of neglecting self-care. For some, this has always been the norm: stay-at-home parents, retirees, caregivers, or digital nomads working remotely.
Staying indoors can sometimes give us a false sense of security, making us forget that our skin is still vulnerable to damage—even without sun exposure. This damage can stem from both unavoidable and preventable factors, but the good news is that there are many holistic ways to care for your skin and keep it radiant.
CLEANSE AND TONE
Cleansers—whether water-based or no-rinse—are a vital first step in any skincare regimen. Cleansing helps remove impurities, clears pores of excess sebum, promotes hydration, prevents bacteria-related conditions, and supports overall skin health.
In general, it's recommended to cleanse your face twice daily: once in the morning and once at night.
The double cleansing method is especially beneficial at night for those who wear heavy skincare or cosmetic products. However, it may be too harsh for individuals with sensitive or dry skin, so it’s best to either reduce the frequency or opt for gentler formulas.
|
Double Cleansing
|
Applied right after cleansing, a toner helps remove lingering residues, restores the skin’s natural pH balance, and preps the skin for subsequent products.
Modern toners may also be formulated to deliver additional benefits—such as exfoliating, brightening, tightening, or minimizing the appearance of pores.
1. Rose Water Toner
The rose flower—especially the Damask rose—has long been valued for its medicinal and therapeutic properties. It offers antibacterial, antioxidant, antitussive (cough-relieving), and respiratory-relaxing effects, among others. Thanks to its anti-inflammatory and anti-oxidative benefits, rose extract can help soothe skin irritation and redness caused by acne, eczema, psoriasis, and rosacea. It also helps naturally balance the skin’s pH, hydrate, and protect it from environmental damage. Rose water can be spritzed directly onto the skin and hair or gently applied to the face and around the eyes using a cotton pad. Preparation (Simmering Method):
Best Done: Shelf Life: |

MOISTURIZE AND NOURISH
Whether you have dry, oily, or combination skin, moisturizers should be a permanent part of your skincare routine. Moisturizers hydrate the skin, replenish moisture, and create a protective barrier—helping keep the skin supple, plump, and resilient. They are best applied immediately after cleansing and toning.
Now, does oily skin still need a moisturizer? Absolutely!
In fact, excess oil production is often the skin’s way of compensating for a lack of moisture and a weakened barrier. This can lead to a cycle where the skin becomes even oilier, increasing the risk of clogged pores and breakouts.
While dry skin types can typically tolerate a wide range of moisturizing ingredients, oily skin benefits more from lightweight, non-comedogenic options like water-based or gel-type moisturizers.
2. Aloe Vera with Olive Oil Moisturizer
Aloe vera contains over 75 active compounds that contribute to wound healing, moisturization, UV protection, anti-inflammation, antiseptic defense, and anti-aging support for the skin. Olive oil, a time-tested skincare staple, offers benefits ranging from makeup removal and moisturization to nourishment, healing, and protection from UV-induced damage. While especially beneficial for dry skin due to its ability to lock in moisture and add a healthy sheen, it may still work for normal to oily skin types—as long as a patch test is done first. Preparation:
Best Done: Shelf Life: |

EXFOLIATE AND BRIGHTEN
Our skin sheds around 600,000 dead skin cells each day. While some naturally fall off, the rest need to be sloughed away to prevent buildup that can lead to acne, dullness, or pigmentation.
Regular exfoliation is key:
|
However, if you have a skin condition that causes heightened sensitivity, it’s best to consult a dermatologist before starting an exfoliation routine. Because many exfoliants and brighteners increase photosensitivity, wearing sunscreen is essential—use at least SPF 15 if you mostly stay indoors, and SPF 30 or higher if you’re often outside.
Yes, even homebodies need sunscreen! Digital screens and indoor lighting can emit low levels of UV radiation, which may contribute to skin damage and even trigger excess oil production. If regular sunscreens feel too heavy, opt for water-based or gel-type formulas—they're lightweight, non-greasy, and ideal for daily use.
Here’s a gentle yet revitalizing scrub that offers both mechanical and enzymatic exfoliation:
3. Papaya and Oats Exfoliating Mask
Papaya is a powerhouse fruit packed with fiber, vitamins, minerals, antioxidants, and bioflavonoids. Ripe papaya contains papain, a natural enzyme that helps dissolve dead skin cells and can reduce the appearance of scars. Oatmeal, while known as a dietary fiber, is also a dermatological gem—offering cleansing, moisturizing, and soothing anti-inflammatory benefits. Together, papaya and oats create a face mask that exfoliates, brightens, and leaves skin soft and radiant. Preparation:
Best Done: Shelf Life: |

TREAT AND PROTECT
Healthy, glowing skin doesn’t mean flawless skin. “Healthy” skin can still have visible pores, a few blemishes, balanced oil levels (neither too oily nor too dry), and an even tone without signs of inflammation.
That said, breakout-prone skin is often one of the most challenging to manage. Skincare routines that work for one person may not work for another, as acne can have many underlying causes and vary by skin type. As such, treating it often requires a bit of trial and error.
To help you get started, here’s a simple homemade face mask using two common kitchen ingredients:
4. Potato and Tomato Mask |

HEALTHY INSIDE, GLOWING OUTSIDE
Our skin reflects our internal health. Nutrient deficiencies and impaired organ function can lead to dull, lifeless skin and worsen conditions like acne, eczema, and premature aging. It’s nearly impossible to achieve lasting radiance with topical products alone.
That’s why a balanced diet, proper hydration, regular exercise, and effective stress management are essential for maintaining a healthy internal system. Not to mention—they can save you a fortune on expensive dermatology visits or skincare products that may offer only temporary results.
5. Skin-friendly Food Chart
Glowing skin or not, you can never go wrong with a balanced diet. And no—"balanced" doesn't mean deprivation. It means choosing the right foods, in the right amounts, at the right times. Avoiding junk food (fast food, processed meats, sugary drinks, etc.) and high-cholesterol foods (like red meat, fried foods, and full-fat dairy) while opting for wholesome, homemade meals is a great first step. Here’s a simple, non-exhaustive skin-nutrient chart to help guide your next grocery trip:
|

6. Cucumber-Lemon Detox Cubes
Aim to drink at least eight glasses or two liters of pure water daily to keep your system running smoothly. A reusable tumbler with volume markers or motivational milestones can help you stay on track. For best results, take your first gulp on an empty stomach, then sip gradually throughout the day to avoid feeling overwhelmed. Still, let’s be honest—plain water can feel a little boring. But that doesn’t mean turning to alcohol, which actually dehydrates the skin. Instead, here’s a quick and refreshing way to level up your hydration: cucumber-lemon detox cubes you can prep in bulk and enjoy all week. So, to perk up your drinking game, here’s an ultra-easy detox cube packed with benefits that you can bulk-prepare anytime. Preparation:
Best Done: Shelf Life: |

7. Must-Have Nutrient Supplement Kit
Vitamin D is one of the most important nutrients that's difficult to obtain in sufficient amounts through food alone. Although still misunderstood by some, just 20 minutes of early morning sun exposure can help your body naturally produce vitamin D. Here’s how it works: when your skin is exposed to UVB rays, the provitamin D3 in the skin absorbs the radiation and converts into previtamin D3, which then synthesizes into vitamin D3—the active form that helps your body absorb and retain key minerals like calcium and phosphorus. Below is a general list of key skin-supporting supplements and their Recommended Daily Allowance (RDA) to help guide your intake:
|

*This chart is for general reference only. Dosage should be balanced between natural food sources and supplements. Always consult your healthcare provider to determine what’s right for your specific needs.
8. Easy Chair Yoga Exercise
Regular physical activity improves circulation, flushes out toxins, and enhances the delivery of essential nutrients to skin cells. Ideally, you should aim for at least 30 minutes of moderate-intensity exercise daily, such as brisk walking or dancing, to support your overall health—including your skin. However, as we age or face certain lifestyle constraints, maintaining a consistent exercise routine can become difficult. Fortunately, there are many low-impact exercises designed for individuals with mobility challenges or those who prefer to start gently. One such option is chair yoga—a form of yoga that uses a chair for support and can be performed either seated or standing. Studies show that chair yoga improves mental health, strength, and flexibility—just like traditional yoga—and can also help manage pain in people with arthritis by improving joint lubrication and balance. Here’s a simple seated chair yoga routine you can try: Preparation:
Routine 1: Chair Uttanasana (Seated Forward Bend)
Routine 2: Chair Utthita Parsvakonasana (Extended Side Angle)
Safety Reminders: |


9. DIY Aromatherapy Linen Spray
To support better sleep, aim for 7 to 9 hours of uninterrupted rest each night. Wind down with a calming bedtime routine that may include reading, listening to soothing music, deep-breathing exercises, or practicing mindfulness or meditation. Another excellent way to ease your mood is through aromatherapy—the use of aromatic essential oils to support holistic well-being. While store-bought aromatherapy products can be pricey, this DIY linen spray is an easy, budget-friendly alternative to help you drift off peacefully under the covers. Preparation:
Tip: |

EXPERIENCE MORE IN ONE
Now that we’ve finished rummaging through your pantry and cabinets, it’s time for something extraordinary—yet still entirely within the realm of “home remedies.”
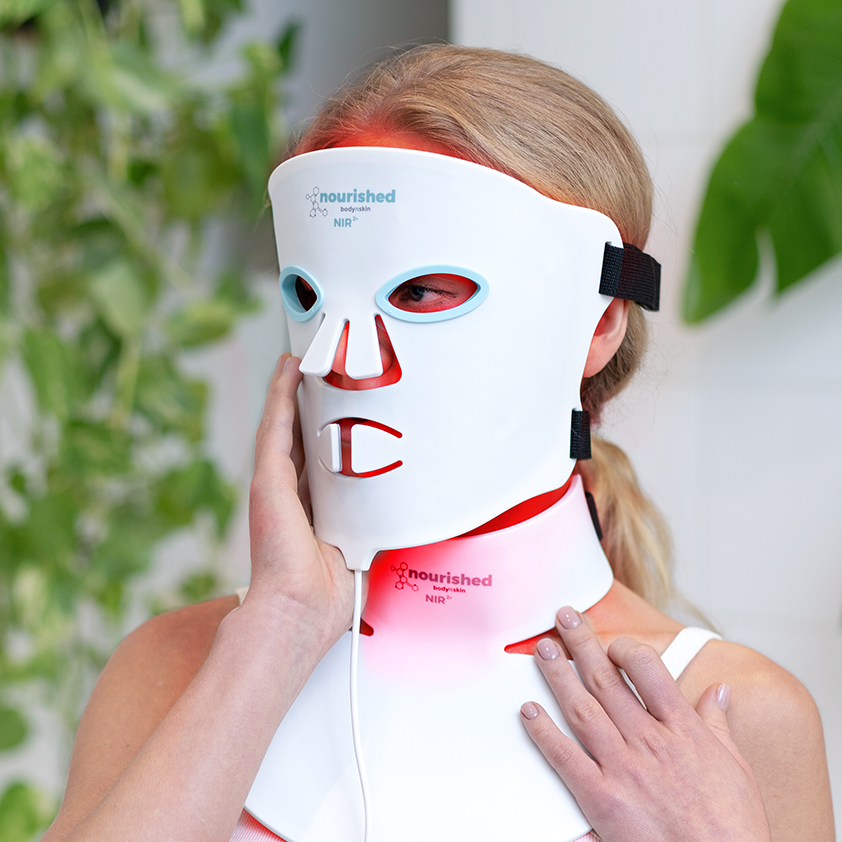
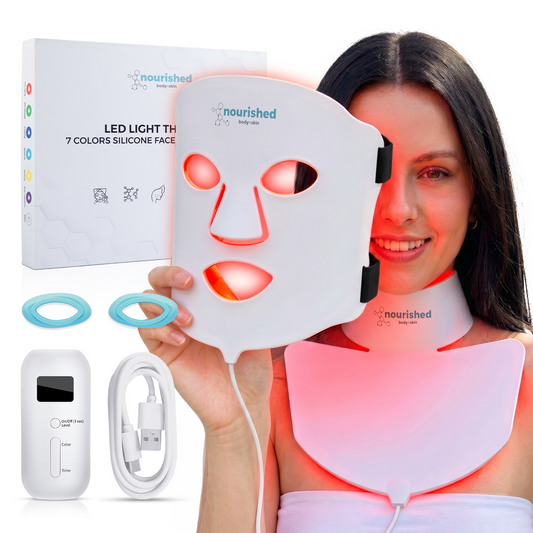
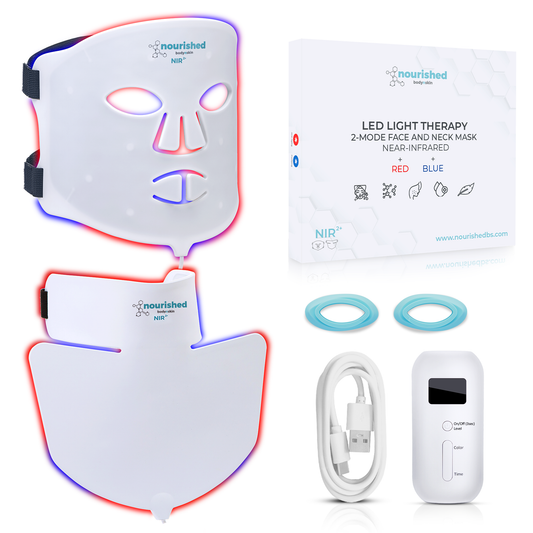
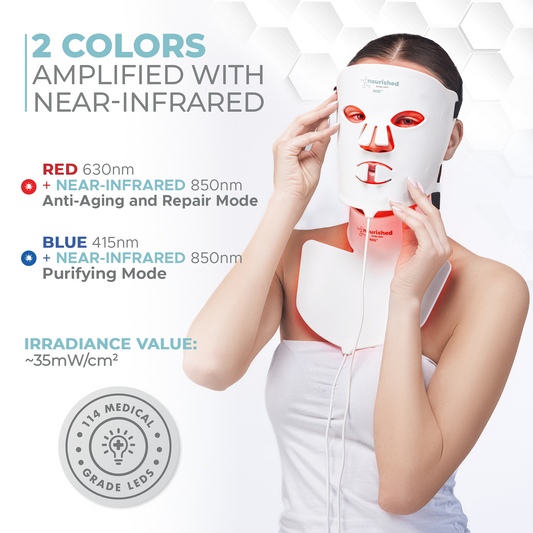
10. LED Light Therapy Mask
Previously, LED treatments were exclusive to salons and dermatology clinics, performed using bulky machines by professional aestheticians—making them expensive. Fortunately, beauty technology advancements now bring this luxurious treatment into your home, offering the same professional-grade benefits at a fraction of the salon price.
Spoiler alert: Our masks are incredibly comfortable and user-friendly—allowing you to relax, work, or unwind, all while enjoying a spa-quality skincare experience at home.
Curious about the science behind the magic? Dive into our expert guides about how LED light therapy works and discover proven strategies to achieve the best results. Explore our full lineup tailored to different skincare needs—including our patent-pending 2-mode LED masks with full mouth coverage, the versatile 7-mode masks, and our ultimate 8-mode Face and Neck Mask Set. If you’re not sure which mask suits you best, check out our comprehensive LED Mask Buying Guide to help you find the perfect fit. |